Three dumpy bags of local quarry stone were carefully lowered onto our neighbour’s parking area on Friday. I set to work straight away, wheeling it in my trusty wheelbarrow up to the top end of the garden. Two tonnes were shifted on Friday afternoon, the remaining tonne on Saturday morning.
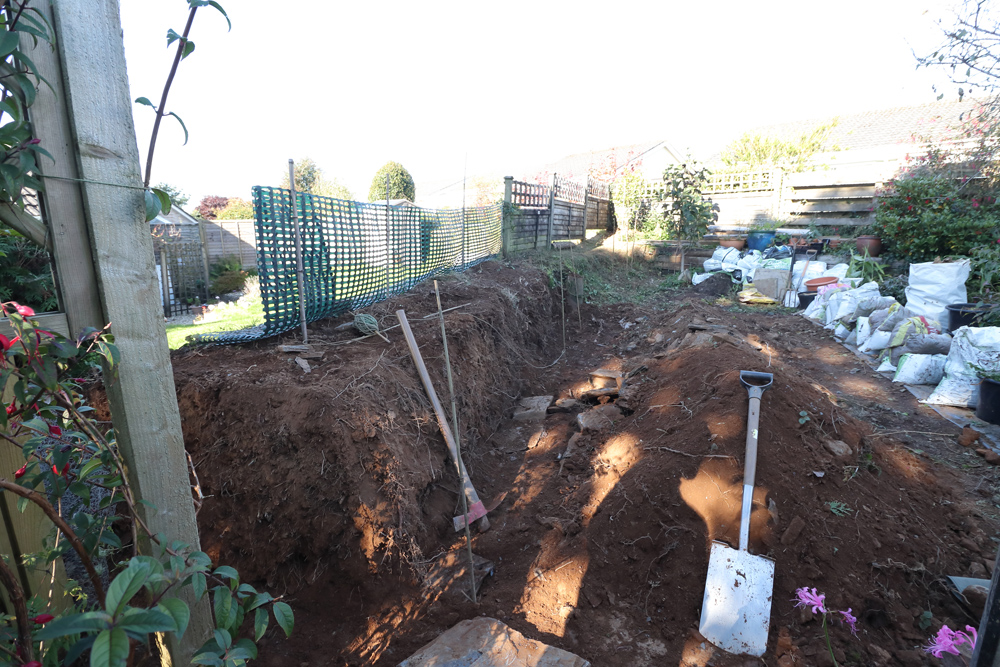
Our estate was built 40 odd years ago on farmland, indeed, the road we live in is named after the farmer. Our garden occupies what was the corner of a field, bounded on two sides by a soil bank that was probably faced with stone in the past. Last year one neighbour had the section of bank between us removed and replaced with a fence, leaving a ten meter stretch of bank running into the corner of the garden. What the landscapers failed to do was to shore up the cut end of the bank that remained. That was my first task on Saturday morning.
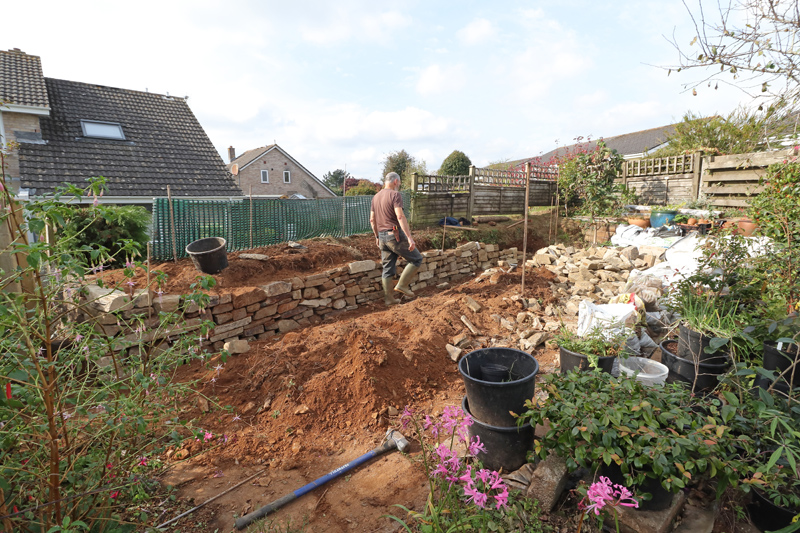
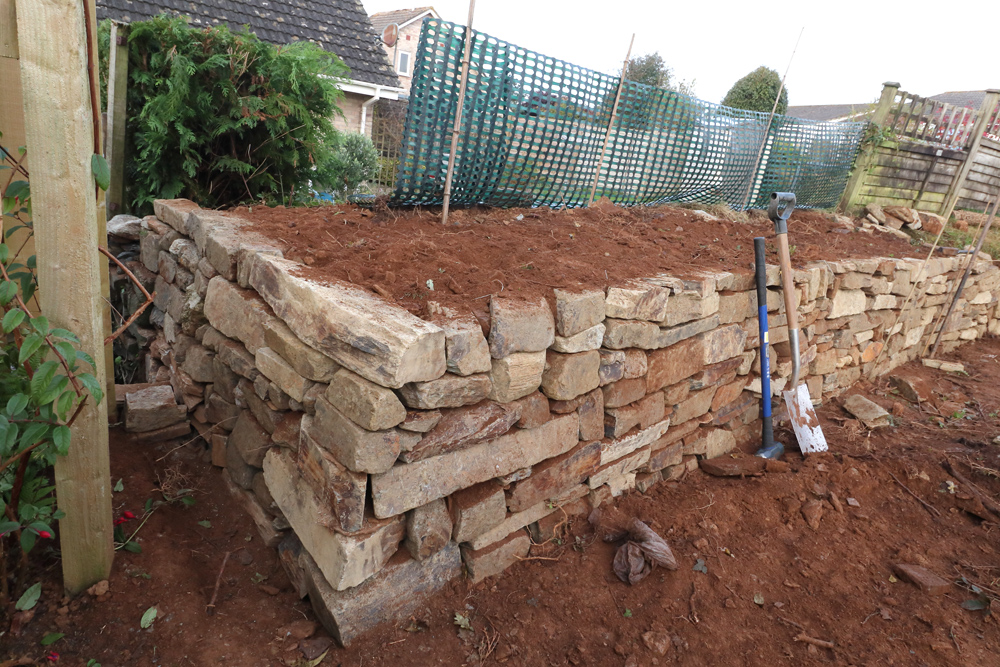
The stonework on our side of the boundary is 70 cms high, but the neighbour’s garden is about 60 cms lower, so on their side I had to dig soil away down to their level, then build it back up with stone. Once that was done and backfilled with soil, I brought the stonework back into our garden and constructed a ninety degree corner into the main run of the wall. I sorted out some of the longest pieces of stone to build into the corner for stability.
By close of play on Saturday I had built up to around 60cm height for about 3m along the bank. I’d hit 5 o’clock, or as it’s better known round here, beer o’clock.

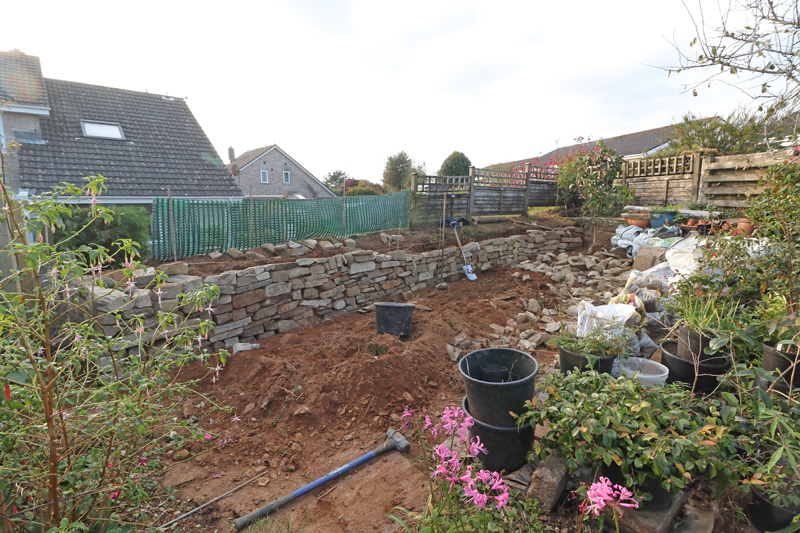
Sunday morning saw battle commence once more. I set up my camera on a tripod and hit the shutter on the hour, every hour, from 9 til 5. I thought I might get it finished, but it still needed another course of stone along about half its length. I was getting to the end of the stone, which meant there often wasn’t a piece the size and shape I wanted for a particular spot.


I have to admit I was a bit thrown by how variable the stone was in size and shape. There are many miles of stone walls (built with mortar), and hedges (packed with soil), in Cornwall. No two are the same. I imagine they get somewhat different types of stone even from different parts of the same quarry but what I got wasn’t what I was expecting. What I expected was flat pieces of various sizes and thicknesses but with a more or less flat top and bottom face and an edge that would form the face of my wall. There were a few like that, but mostly it was lumps with faces at odd angles. There’s a nagging thought in my head that I might have been fobbed off with a lot of reject stone that a more experienced customer might have taken one look at and told them to take away. The fact is I have no idea, I could as easily have been given a very good sample or an entirely average one, I just don’t know.
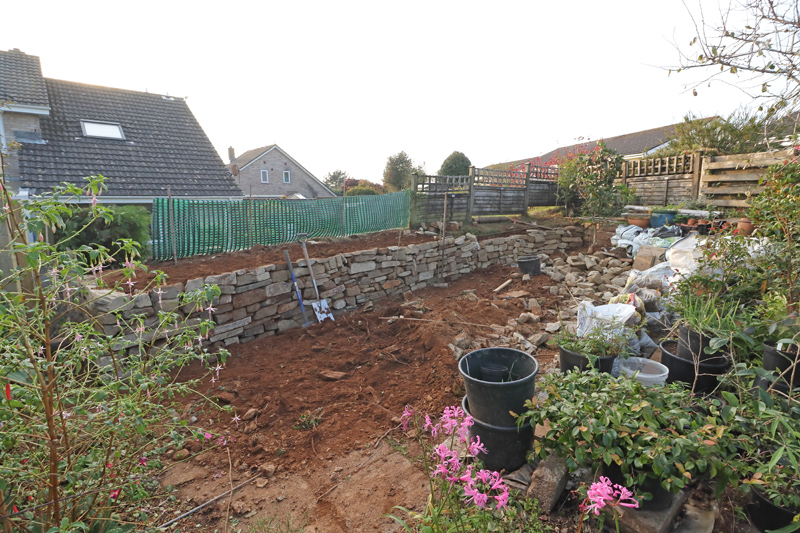
I did the best I could with what I had. I picked good faces to form the front of the wall, I ran some longer pieces straight into the bank, to bind the stone to the bank. I tried to keep it straight but to have a slight batter against the bank. I filled in with soil as I went up, tamping it down firmly with a piece wood. With about 15cms to go, I pulled a line tight across the top and fitted a final course to give reasonably straight top to the wall. I tried to ensure that every piece was held in place by being wedged between its neighbours or held down by a piece on top, preferably both.

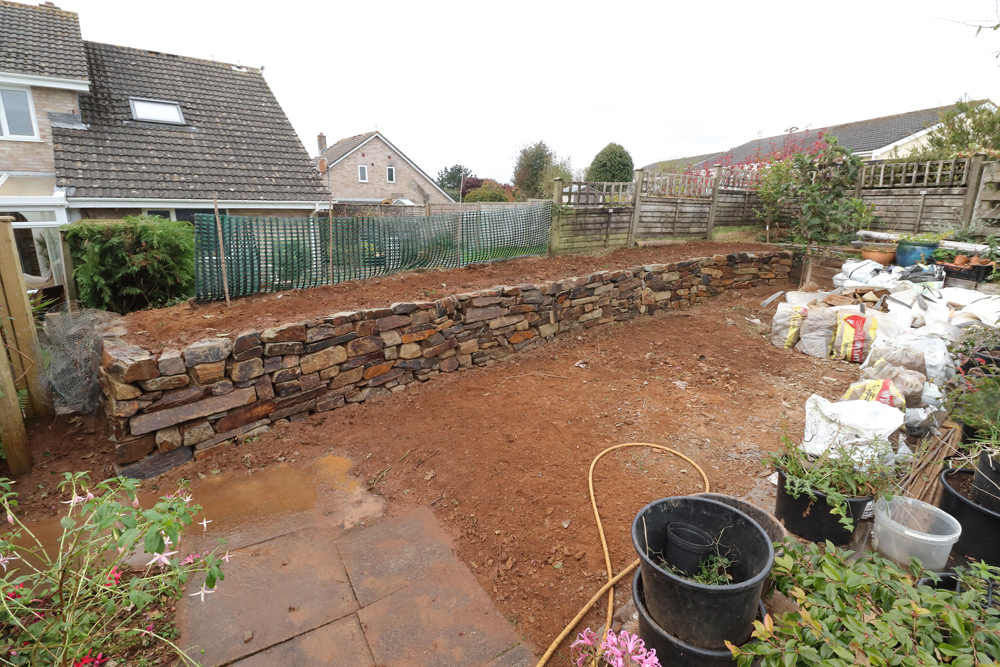
The next phase is to erect a fence along the middle of the bank but I’m hoping for a few days break before the materials for that get delivered. I need to get my trusty double handed shovel back to dig holes for the posts. On present plans I’ll dig this area over then leave it for the winter. My present plans have a habit of not lasting long so that probably won’t happen.
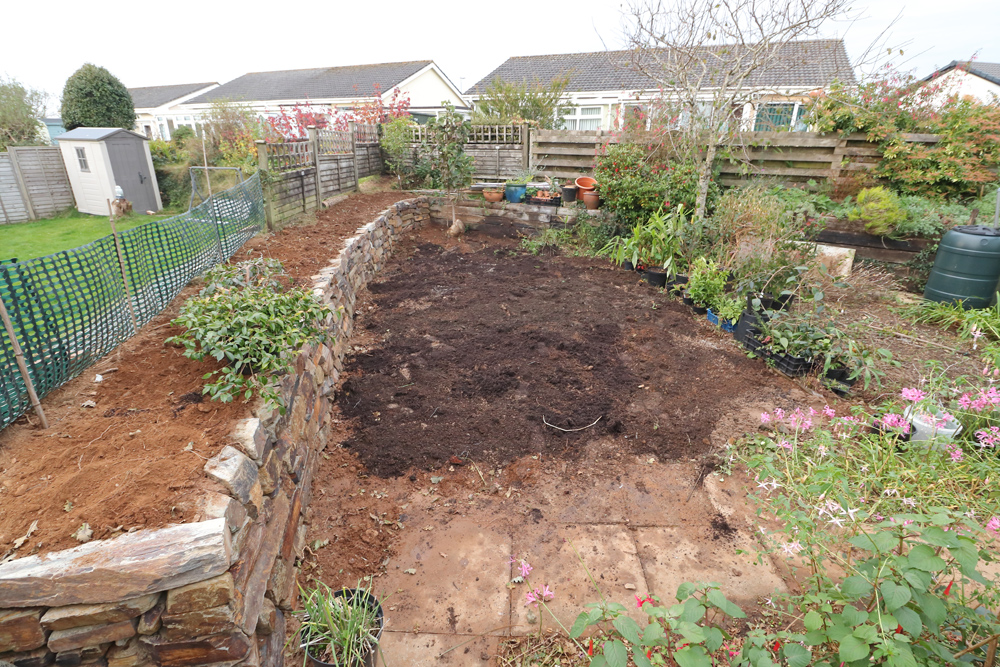
Moving the tunnel was definitely the right thing to do but it’s robbed me of an out of sight dumping ground for spare paving slabs and pots of struggling plants. It’s also robbed me of the place I put plants pending a decision about what to do with them. The plant atop the wall is a prostrate camellia, still in its pot but that might well find a home up there. I’ve already planted a few daffs and chionodoxas along the top. It’s a start.

It is all so square and . . . stackable. My sandstone was so awkwardly angular. The walls needed to be sloped inward, and were packed with soil and cruddy broken bits. It worked, and sort of stayed together . . . . until a neighbor dismantled it for his a pavers on his property. (Like he did not know that anyone wanted all that stone that was set so neatly into a wall like that?!) I used some of the sandstone for the floor of the redwood stump shower.
LikeLike
Redwood stump shower!?? The mind boggles.
LikeLiked by 1 person
?!
My neighborhood was clear cut harvested about a century ago, while San Francisco and the surrounding region was rebuilding after the Great Earthquake and Fire. The secondary vegetation burned in about 1955. The fire hollowed out many redwood stumps. I built one into a shower, and put an outhouse on top of another. There was a very large stump that I wanted to build into a guest room.
LikeLike
Sequoia sempervirens grows much less well here than Sequoiadendron so it’s hard to imagine them having huge stumps. There’s a sad tale in a book I have about one of the giant redwoods being felled, the stump turned into a dance floor and bowling alleys made on the peeled trunk. It had been over 300ft tall and 1244 years old. The same book says the coast redwoods are only able to grow as tall as they do because see fog supplies the top of the trees with moisture so it doesn’t have to conduct it up the trunk. We don’t get the right conditions for them to really thrive.
LikeLiked by 1 person
Sequoia sempervirens probably dislikes the cooler weather. Because it grows in the mountains, it seems like it should not mind cool weather. However, it is a coastal tree, so does not naturally experience weather as cool as that of inland mountains. Nor does it often experience snow. It snows near the summit here every few years or so, and makes a terrible mess of the redwoods. I suspect that those that live farther north, and have more experience with snow, adapt to it, and can support the weight a bit better. Regardless, although they are taller than the giant redwoods, their trunks are not as massive. They can do well in climates in other regions, but not matter how happy they are, will take thousands of years to compare to those here. They are very social trees, so individual specimens are never as happy as those in groves. Furthermore, those that are available elsewhere are cultivars that were selected for landscape use. No one really knows how they will perform for thousands of years. When people from the East discovered the trees, particularly the giant redwoods, lumber barons cut down the largest trees for bragging rights. It was sport to them, like shooting into herds of buffalo without bothering to get off the train. They all wanted to find a tree that was bigger than the last, and have their crews cut it down, so that they could get their picture taken on the stump.
LikeLike
That attitude is still all too prevalent, there are still people who think that shooting giraffes for “sport” says something positive about them.
LikeLiked by 1 person
Fortunately, we need not invite people such as that into our gardens.
LikeLike
Indeed.
LikeLiked by 1 person
Brilliant job, looks great.
LikeLiked by 1 person
That was a lot of heavy work – I don’t know how you had the strength, energy and determination to get so much done over such a short period of time. Well done, your wall looks terrific!
LikeLike
I had a day off today and I’m still knackered. I’m building up to digging post holes for the fence at the weekend.
LikeLike
The hourly pictures certainly show the scale of the project. It looks great, worth all the hard work. Looking forward to seeing the planting in due course
LikeLike
Well, that’s the first part done, next is the fence. Block out the view of the neighbours. Planting is some way down the track.
LikeLike
Wow that’s a lot of work! The wall looks great – I can see you’re going to have a lot of fun deciding what to plant along and up it.
LikeLike
I am indeed. It’s still not clear to me how much sun it’s going to get once the fence has been erected on top, so I don’t want to get ahead of myself planning what to plant.
LikeLiked by 1 person
Blimey that looks like hard work! I am worried about removing our unused trampoline, I store all manner of crap under that. Where would it go??
LikeLike
The key word is crap. If it’s crap why would you want or need to keep it? It’s all very simple. That at least is the level of sympathy I usually get from you know who.
LikeLike
But but, all those plastic plant pots trays, and the broken modules, and the torn bags and the offcuts of old wood, broken paving stones. Surely they’ll come in handy at some point!
Might need a skip…
LikeLike
I’m a terrible hoarder of things that might come in useful. The left over stone needs to be my first foray into online selling/giving away. I REALLY don’t have room to keep that.
LikeLike
A superlative effort there, and that wall will definitely not need hiding with a glasshouse. I look forward to watching the new planting. You must be super fit after all that work. Congratulations are in order.
LikeLike
Thank you. I don’t feel fit for much I can tell you. I’ve had a rest day today, in relative terms.
LikeLike
Blimey Jim, that’s quite a wall you have built. Does the boundary run through the middle of this bank then? Be interesting to see how the planting progresses. Hedging?
LikeLike
Yes, the boundary is marked on the deeds as up the middle of the bank. Trouble is that the bank has eroded on one side or the other by very different amounts in different places so it’s not so clear where the line originally ran. I took out the last short stretch of scrappy hedge we had from this bit of bank; I’m replacing it with a fence, I’m not keen on hedge cutting.
LikeLiked by 1 person
I was thinking more of a Fuchsia hedge, or Escallonia. I fancied some here, but it is too windy for tall plants on my Cornish hedge.
LikeLike
I’m hoping the fence won’t look too ugly so it can be a backdrop to a variety of things. I also need to see how many hours of sunlight the bed gets.
LikeLike
Wow! That was a huge job! The stones look great to me, but I can understand your frustration with the uneven stones you got.
LikeLike
I have a hunch that if the stones had been much more uniform it would have been easier to build and a lot less pleasing to look at when done. I’m paying much more attention to all the stone walls around here, I think mine is one of the better lookers but whether it will stand up as long is another matter. Unless our very local quarry has over its lifetime produced a wide range of stone, appearance wise, a lot of local walls brought stone in from somewhere further away, which I’m finding slightly surprising. Perhaps professional wallers prefer to work with particular stone, or have arrangements with particular quarries.
LikeLike
You are a keen observer. Your wall is eye-pleasing.
LikeLiked by 1 person
I think you’ve done a magnificent job. The stones, despite what you thought about odd shapes, are sitting handsomely. And what a thing to look forward eventually…all that planting to be done on top.
LikeLike
On top and in between the stones. No reason for a boundary to be purely functional.
LikeLiked by 1 person
A really lovely job Jim. Take care with fence stability. Years ago sloping ground behind our garden was leveled by new arrivals without regard to our fence. It’s all stable but over time it has leant inwards to their garden. luckily our posts and gravel boards were set in deep or with the ground dug away the whole darn lot would have fallen into the garden behind us. I’m too old for it to bother me much now. The fence is going to receive a few clematis in the spring.
LikeLike
The posts are 2.4m and I only need 1m sticking out; they’ll go deep but maybe not all 1.4m deep.
LikeLike